
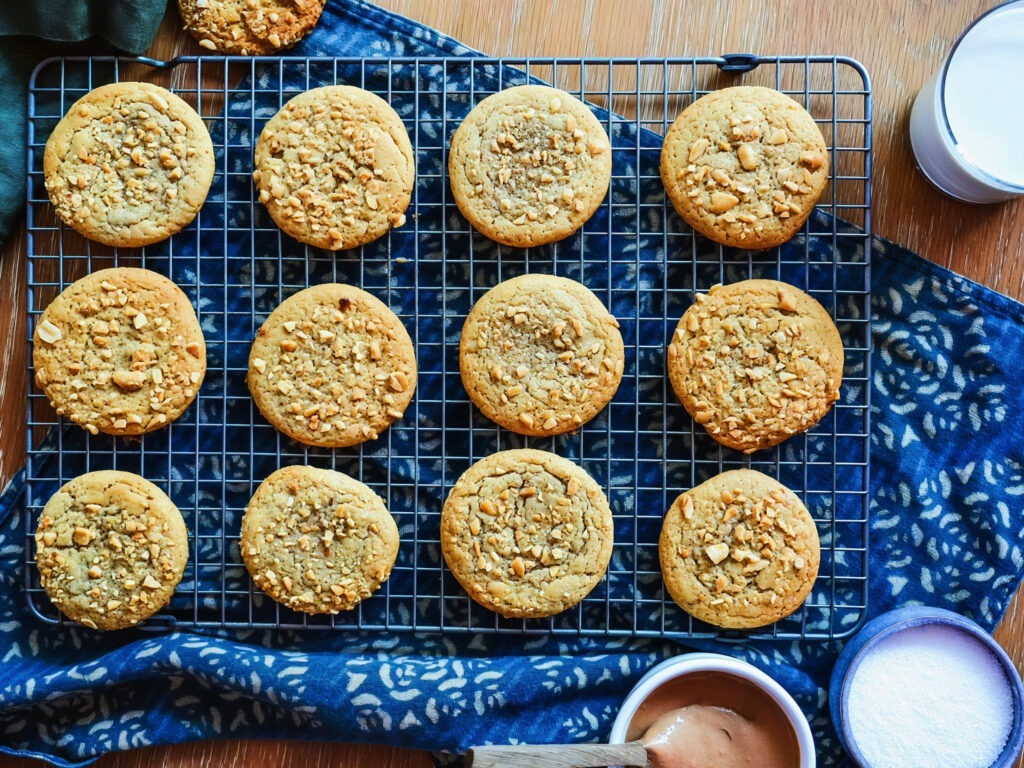
Classic, peanut-packed, old-school cookies from a vintage family recipe card. These bake up soft in the middle with crackly, golden tops and a salty roasted-peanut coating that gives them the perfect crunch. The original version uses shortening, but I tested them with butter and honestly prefer the richer flavor.
Why You'll Love This Recipe
- Total Vintage Perfection: A genuine, no-fuss, old-school recipe that delivers pure nostalgia.
- Superior Texture: Soft, chewy center, thin, lightly crisp edges, and a crunchy, salty peanut crust.
- Zero Chill Time: The dough is designed to be scooped and baked immediately, saving hours of waiting.
- Flexible Fat: You choose between the rich flavor of butter or the classic textural performance of shortening.
- Feeds a Crowd: This recipe produces a generous, high-volume batch (around 64 cookies).
My Take
This is one of those recipes that looks unbelievably simple on paper but turns out way better than you expect. My great-grandma wasn't fancy — her cookies were straightforward, not giant, and not overloaded with “stuff.” These fit right into that style. Rolling them in chopped peanuts gives them this old-school texture and look that feels straight out of a church bake sale or the 1960's holiday cookie table. If you like peanut butter cookies with crunchy edges, these are ridiculously satisfying.
Favorite Equipment
Heats evenly, doesn't warp, and bakes cookies with consistent bottoms every single time. Cookies release cleanly whether you grease or use parchment. This is the pan I use for 95% of my cookies.
Helps the cookies set so they don't overbake from residual heat.
Keeps all the cookies the same size so they bake evenly and look uniform.
Key Ingredients & Why They Work
The components of the Carter Cookie look simple, but understanding the chemical role of each ingredient is how we ensure that perfect vintage texture every time.
Baking Soda & Cream of Tartar
This recipe relies on a dual-leavening system. Baking soda is a base, and it needs cream of tartar (an acidic salt) to fully activate and generate carbon dioxide gas. This creates an immediate, powerful chemical reaction that causes the cookies to puff quickly and then spread. This rapid rise and fall is responsible for that unique, beautiful crackly top that defines this cookie style.
Brown Sugar (Molasses Content)
While granulated sugar promotes spread and crisping, the brown sugar is essential for tenderness. The molasses in brown sugar is a humectant—it actively attracts and locks in moisture. This prevents the baked cookie from drying out and maintains that soft, slightly chewy center long after the cookie has cooled, which is necessary for a perfect peanut butter cookie.
Shortening vs. Butter
Your choice of fat fundamentally changes the final texture. Shortening is $100\%$ pure fat and has a higher melting point, resulting in a cookie that spreads less and holds a uniform, puffy shape—the classic vintage look. Butter is only about $80\%$ fat (the rest is water and milk solids), which gives it a lower melting point, causing more spread and a richer, more complex flavor.
Cream-Style Peanut Butter
You must use an emulsified, shelf-stable, cream-style peanut butter (like Jif or Skippy). The emulsified fats provide the necessary binding properties for a smooth, cohesive dough. Natural peanut butter, where the oil separates, introduces too much free fat, which can lead to a crumbly, dense, and greasy dough that fails to hold its structure.
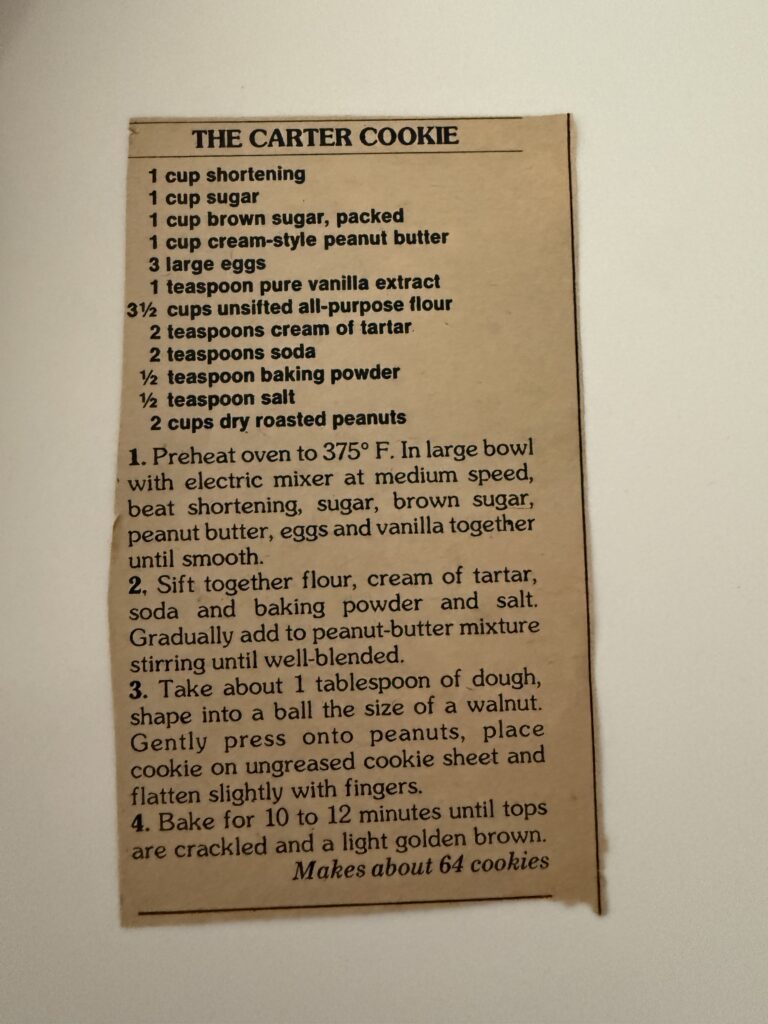
Ingredients for the Carter Cookie
Cookie Dough
- 1 cup shortening (or use 1 cup unsalted butter for richer flavor)
- 1 cup granulated sugar
- 1 cup brown sugar, packed
- 1 cup cream-style peanut butter
- 3 large eggs
- 1 teaspoon vanilla extract
- 3 1/2 cups all-purpose flour (unsifted)
- 2 teaspoons cream of tartar
- 2 teaspoons baking soda
- 1/2 teaspoon baking powder
- 1/2 teaspoon salt
Coating
- 2 cups dry roasted peanuts, finely chopped
How to Make The Carter Cookie
1. Preheat the Oven
Preheat to 375°F (190°C).
Use ungreased baking sheets for thicker cookies or parchment for slightly flatter ones.
2. Make the Peanut Butter Base
In a large mixing bowl, beat together:
- shortening (or butter)
- granulated sugar
- brown sugar
- peanut butter
- eggs
- vanilla
Mix on medium until smooth and creamy.
3. Combine the Dry Ingredients
In a separate bowl, whisk together:
- flour
- cream of tartar
- baking soda
- baking powder
- salt
Gradually mix the dry ingredients into the peanut butter mixture until a cohesive dough forms.
4. Scoop & Roll
Scoop dough into 1-tablespoon balls (walnut size).
Press the tops lightly into the chopped peanuts.
Place on baking sheets and flatten slightly with your fingertips.
5. Bake
Bake 10–12 minutes.
They should be light golden brown with crackly tops.
Cool on the sheet for 2 minutes, then transfer to a wire rack.
Ingredient Swaps & Substitutions
Swapping Solid Fat (Butter/Shortening) for Liquid Oil This is a critical substitution error in baking. Cookies rely on a solid fat for structure and the creaming process (Step 2). If you swap the butter or shortening for a liquid oil (like vegetable or coconut oil), you will completely eliminate the ability to incorporate air through creaming. This lack of initial aeration results in a cookie that is dense, lacks spread, and has a heavy, greasy texture. Always use a solid, room-temperature fat.
Substituting Cream-Style Peanut Butter Do not substitute the cream-style peanut butter (like Jif) with natural, oily peanut butter. Natural peanut butter contains oil that separates and is not bound to the solids. When this free oil is introduced to the dough, it disrupts the fat-to-flour ratio, which is crucial for structural integrity. The result is often a dough that is oily, greasy, and bakes into a dry, crumbly cookie that doesn't hold together.
Reducing or Replacing Sugar Sugar performs many functions beyond sweetness, including controlling browning (Maillard reaction), providing bulk, and ensuring tenderness by interfering with gluten development. While zero-calorie substitutes exist, they lack the bulk and moisture-retaining properties of real sugar. If you must reduce the sugar for dietary reasons, do not replace more than 10-15% of the total sugar, or the resulting cookie will be paler, denser, and lack the classic spread and tenderness.
Flour Substitutions The all-purpose flour provides the necessary gluten structure to hold the cookie's shape. While you can replace a small amount (up to 25%) with a nut flour like almond flour for a slightly softer texture, substituting the entire amount is difficult. If you must go completely gluten-free, use a reliable all-purpose gluten-free blend that contains xanthan gum to mimic the binding function of wheat gluten.
Storage & Make-Ahead Tips
- Room Temperature: Store baked and completely cooled cookies in an airtight container at room temperature for up to 5 days.
- Freezing Baked Cookies: Once cooled, place the cookies in a freezer-safe zip-top bag with a piece of parchment paper between layers. They will keep for up to 3 months. Thaw at room temperature.
- Freezing Dough: Scoop and roll the dough balls as directed in step 6. Place them on a baking sheet and freeze until solid. Transfer the frozen dough balls to a freezer bag and store for up to 3 months. Bake from frozen, adding 1-2 minutes to the bake time.
Frequently Asked Questions
- Why do I need Cream of Tartar and Baking Soda? This combination is called double-acting leavening. Cream of tartar is an acidic salt that reacts immediately with the baking soda to create a quick burst of gas, which promotes the cookie's initial puff and eventual crackle.
- The cookies didn't spread enough—what happened? Cookies that don't spread usually contain too much flour (always weigh your flour!) or the dough was chilled (this recipe is designed for immediate baking). If your dough feels too stiff, add one teaspoon of milk and mix until it softens slightly before scooping.
- Can I use salted peanuts for the coating? Yes! Using salted dry roasted peanuts for the exterior coating provides an excellent contrast to the sweetness of the cookie, enhancing the overall peanut flavor.
The Final Verdict & Share! There's nothing better than a truly classic cookie executed perfectly. This vintage Carter Cookie is pure comfort, nostalgia, and buttery (or shorteny!) perfection. Go make a batch, fill your cookie jar, and share this recipe with someone who appreciates the simple joy of old-school baking!

The Carter Cookie
Ingredients
- 1 cup shortening
- 1 cup granulated sugar
- 1 cup brown sugar packed
- 1 cup cream-style peanut butter
- 3 large eggs
- 1 teaspoon vanilla extract
- 3 1/2 cups all-purpose flour unsifted
- 2 teaspoons cream of tartar
- 2 teaspoons baking soda
- 1/2 teaspoon baking powder
- 1/2 teaspoon salt
- 2 cups dry roasted peanuts finely chopped, for coating
Equipment


Method
- Preheat oven to 375°F (190°C). Leave baking sheets ungreased or line with parchment.
- In a large mixing bowl, beat shortening, granulated sugar, brown sugar, peanut butter, eggs, and vanilla with a hand mixer at medium speed until smooth.
- In a separate bowl, whisk flour, cream of tartar, baking soda, baking powder, and salt. Gradually add dry ingredients to the peanut-butter mixture and mix until well blended.
- Shape dough into 1-tablespoon balls (about walnut size). Roll or press the tops into the chopped peanuts, place on baking sheet, and flatten slightly with fingers.
- Bake 10–12 minutes, until tops are crackled and cookies are light golden brown. Cool 2 minutes on the sheet, then transfer to a wire rack.
Nutrition
Notes
Tried this recipe?
Mention or tag @bakedlean!Related Posts

One response to “The Carter Cookie: A Classic Peanut-Packed Vintage Treat”


The beast PB cookies!


Leave a Reply